Servicing : Gold CoastBrisbaneSunshine CoastToowoomba

How to Prepare Your Garage Floor for Epoxy — A Step-by-Step Guide
Preparation is the reason garage epoxy floors fail. Not the epoxy product. Not the topcoat colour. Not the brand. When a homeowner in Ipswich or Toowoomba discovers their garage floor has started peeling two summers after installation, the cause — in the vast majority of cases — traces directly back to inadequate surface preparation. Acid etching instead of diamond grinding. Untreated oil contamination. No moisture vapour testing. Primer applied over a contaminated surface.
At Resin Masters, we install garage floor epoxy across Brisbane, Gold Coast, Logan, Sunshine Coast, Toowoomba, Ipswich, and Northern NSW — and we prepare every single slab to the same standard regardless of project size or budget. This guide explains exactly what correct preparation involves, why each stage matters, and what the difference looks like between a preparation process that delivers a 15-year floor and one that produces a 2-year failure.
Whether you’re planning a DIY garage floor project or evaluating a professional quote, this guide gives you the knowledge to make the right call.
Why Surface Preparation Determines Everything
100% solids commercial-grade epoxy — the product Resin Masters uses on every installation — bonds to concrete through two mechanisms: mechanical adhesion (the epoxy flows into the surface texture of the concrete and locks in as it cures) and chemical adhesion (the primer creates a chemical bond at the concrete-epoxy interface). Both mechanisms require the concrete surface to be clean, profiled, and dry at the time of application.
A smooth, contaminated, or moisture-affected concrete surface eliminates both mechanisms. The epoxy has nothing to grip mechanically, and contamination at the surface breaks the chemical bond before it can form. The result is a floor that looks perfect at installation and begins delaminating within one to two Queensland summers as thermal cycling, vehicle loads, and UV exposure stress the failed bond.
The preparation process creates the conditions both mechanisms require. Diamond grinding creates the mechanical profile. Degreasing removes the contamination that breaks chemical adhesion. Moisture testing identifies the vapour pressure that causes blistering from below. Crack repair creates a structurally sound substrate. Primer creates the chemical foundation. Skip any stage and the whole system is compromised — regardless of how good the epoxy product above it is.
Tools and Safety Equipment You Need
|
Item |
Purpose |
Where to Source |
|
Industrial diamond grinder |
Mechanical slab profiling — the core preparation tool |
Equipment hire — Kennards, Coates, Total Tools |
|
HEPA industrial dust extractor |
Silica dust extraction during grinding — WHS mandatory |
Equipment hire — attached to grinder during operation |
|
Angle grinder + diamond cup wheel |
Edge and corner profiling where floor grinder can’t reach |
Tool hire or purchase — Makita, Bosch, Metabo |
|
P2 respirator (half-face) |
Protection from crystalline silica in concrete dust |
Safety suppliers — Bunnings, Total Tools, Blackwoods |
|
Safety glasses / goggles |
Eye protection from grinding fragments |
Safety suppliers — any hardware store |
|
Hearing protection (class 5) |
Grinders operate above safe unprotected exposure levels |
Safety suppliers — any hardware store |
|
Chemical-resistant gloves |
Hand protection during degreasing operations |
Safety suppliers — nitrile or neoprene minimum |
|
Stiff deck brush + pump sprayer |
Degreaser application and scrubbing |
Hardware stores — Bunnings, Mitre 10 |
|
Wet-dry vacuum |
Extracting rinse water after degreasing |
Equipment hire or hardware store |
|
Moisture vapour test kit |
Quantifying slab moisture before primer selection |
Trade epoxy suppliers — or use plastic sheet field test |
|
Crack filler (two-part polyurea) |
Filling non-structural surface cracks before grinding |
Trade epoxy suppliers — Sika, Mapei, Fosroc |
CRITICAL SAFETY NOTE: Concrete grinding generates crystalline silica dust — a Class 1 carcinogen under Australian WHS legislation. Standard dust masks are inadequate. P2-rated half-face respirators are the minimum required protection. Industrial dust extraction attached directly to the grinder significantly reduces airborne dust concentration. Without proper extraction, DO NOT grind concrete in an enclosed garage space without full respiratory protection.
The 7-Step Garage Floor Preparation Process
1. Assess the Floor — What Are You Working With?
Walk the floor systematically before touching any equipment. You need to know: Does the concrete have existing paint, sealer, or previous coating? Are there oil stains from vehicle maintenance or fuel spills? Are there cracks — hairline, active, or structural? Does the floor have any areas that feel hollow when tapped (indicating delamination of a previous coating or sub-surface void)? Spray a light mist of water across the entire floor — anywhere the water beads rather than absorbs indicates oil contamination. Mark all contaminated areas. This assessment determines your preparation sequence and which products you need before you hire any equipment.
2. Degrease Oil-Contaminated Zones
Oil contamination must be treated before any mechanical preparation — grinding a contaminated surface drives oil deeper into the concrete rather than removing it. Apply an alkaline concrete degreaser at full manufacturer-recommended concentration to all contaminated zones identified in Step 1. Scrub with a stiff deck brush and allow the product to dwell for the specified time (typically 10–20 minutes). Rinse thoroughly with clean water and extract the contaminated rinse water with a wet-dry vacuum. Repeat the water bead test — if water still beads in any treated zone, the degreasing process must be repeated, or scarification (mechanical removal of the contaminated concrete layer) is required. Never proceed to grinding over zones that still bead water.
3. Remove Existing Paint, Sealers, or Previous Coatings
Any existing coating must be fully removed before epoxy application. Diamond grinding is the correct removal method — the same equipment and process used for surface profiling will grind through existing coatings when fitted with the appropriate tooling. For thick paint build-up or multiple coating layers, heavy-duty diamond cup tooling on the floor grinder removes material efficiently. Chemical paint strippers work for isolated areas but are inadequate as a whole-floor removal method for epoxy installation. The objective is bare, exposed concrete across the entire floor area — no remaining paint, sealer, tile adhesive, or coating residue anywhere.
4. Industrial Diamond Grinding — The Non-Negotiable Step
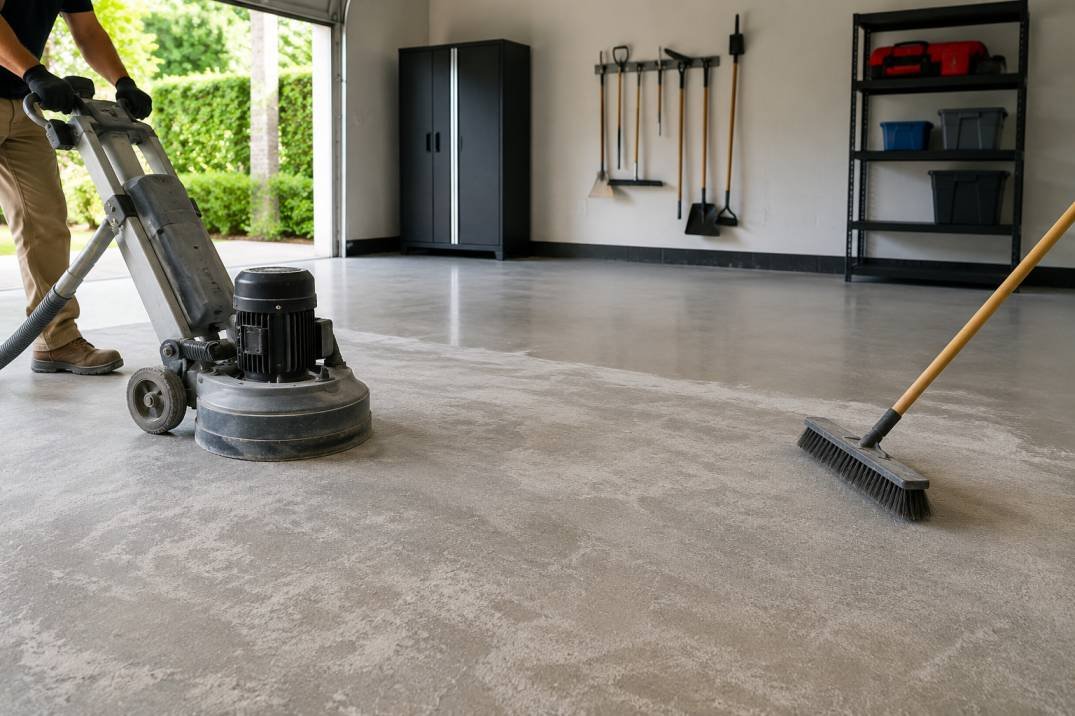
This is the step that determines whether your epoxy floor lasts 15 years or 18 months. Industrial diamond grinding mechanically profiles the concrete surface — creating a texture equivalent to 40–60 grit sandpaper that the epoxy bonds into. Run the grinder across the entire floor area in overlapping passes, maintaining consistent speed. The ground surface should appear uniformly light grey across the entire area — any darker patches indicate areas of contamination or surface variation that require additional grinding passes. Use an angle grinder with a diamond cup wheel for all edges within 50–100mm of walls, around drains, and in corners where the floor grinder cannot reach. Extract all grinding dust continuously using the HEPA industrial vacuum attached to the grinder’s extraction port.
5. Repair Cracks and Surface Defects
After grinding, all cracks and surface defects are clearly visible and accessible for repair. For hairline and surface cracks (non-active, less than 3mm width): clean the crack with compressed air or a vacuum, apply two-part polyurea or epoxy crack filler using a dispensing gun, overfill slightly, and grind flush after cure (typically 20–30 minutes for polyurea). For active cracks (showing evidence of ongoing movement): use flexible polyurea filler that accommodates movement rather than rigid epoxy filler that will re-crack. For wide cracks or structural concerns: consult a structural engineer before proceeding — epoxy coating over a structurally failing slab is not a solution and will not hold.
6. Test for Moisture Vapour Emission
Before applying any primer, test the prepared slab for moisture vapour emission. The field test method: tape a 300 × 300mm sheet of clear plastic to the ground surface with all edges fully sealed using duct tape. Leave it undisturbed for 16–24 hours. Condensation under the plastic indicates elevated moisture vapour emission — the concrete is releasing more moisture than standard primer systems can manage. In Queensland and Northern NSW’s subtropical climate, elevated moisture readings are common — particularly in older garages, properties near garden beds, and low-lying blocks. The moisture reading determines which primer you select. Standard conditions: penetrating epoxy primer. Elevated conditions: moisture-tolerant primer or moisture vapour barrier system. Applying a standard primer over an elevated-moisture slab without testing is one of the most common causes of epoxy blistering and delamination in Australian garages.
7. Apply Primer
Immediately after completing grinding, crack repair, and moisture testing, apply the selected primer to the prepared concrete — do not leave a prepared surface overnight before priming, as dust settlement and humidity can compromise the prepared surface. The primer penetrates the ground concrete surface, fills the microscopic pores, and creates the chemical foundation the epoxy bonds to. Apply primer using a medium-nap roller in a single thin, even coat — primer is not a thickness product, it is a bonding agent. Allow to cure to the manufacturer’s specified tack-free time (typically 4–6 hours at Australian ambient temperatures) before applying the epoxy base coat. Resin Masters selects primer chemistry matched both to the slab’s moisture reading and to the specific 100% solids low-VOC epoxy system being installed above it. Contact Us!
Diamond Grinding vs Acid Etching — Why the Choice Matters
Acid etching — washing the concrete with diluted muriatic acid — is the preparation method recommended by most retail garage floor paint and kit manufacturers. For the water-based epoxy paint products these kits contain, acid etching provides adequate surface opening for the thin film that water-based chemistry deposits.
For 100% solids commercial-grade epoxy — the product Resin Masters uses — acid etching is inadequate for two reasons. First, it produces insufficient surface profile depth for the thick, dense film of 100% solids epoxy to develop the mechanical adhesion bond needed to withstand vehicle loads and Australia’s thermal cycling. Second, acid etching leaves behind residue (dissolved calcium carbonate from the concrete matrix) that must be fully neutralised and rinsed — an incomplete process that leaves surface contamination interfering with chemical adhesion.
|
Factor |
Diamond Grinding |
Acid Etching |
|
Surface profile achieved |
CSP 2–4 (correct for 100% solids epoxy) |
CSP 1–2 (adequate for thin water-based systems only) |
|
Oil contamination removal |
Removes surface contamination |
Does not penetrate or remove oil contamination |
|
Existing coating removal |
Yes — removes all existing coatings |
No — cannot remove existing coatings |
|
Residue risk |
None — mechanical process only |
Yes — acid residue requires thorough neutralisation |
|
Moisture effect |
None — does not add moisture |
Adds significant moisture to the slab |
|
Suitable for 100% solids epoxy |
Yes — the correct preparation method |
No — inadequate for vehicle-traffic garage systems |
Resin Masters — Professional Preparation Across All 7 Locations
Resin Masters performs every preparation stage described in this guide on every garage floor epoxy installation across our service area. We bring the industrial diamond grinder, HEPA dust extraction, degreasing products, crack fillers, and moisture testing equipment to every job. You clear the garage — we handle every preparation and installation stage.
Our preparation process is the foundation of the 7-year warranty we write into every quote. Preparation quality determines whether the 7-year warranty is achievable — and it’s why we never shortcut it regardless of project size, budget, or timeline.
Also Read:- How to Clean and Maintain Your Garage Epoxy Floor — The Complete Guide
|
Brisbane & Surrounds |
Gold Coast |
Logan & SEQ |
Sunshine Coast |
|
Toowoomba |
Ipswich |
Northern NSW |
Free Quotes — 48hr turnaround |
 Call Resin Masters: +61 433 733 956
 Email: info@resinmasters.com.au
 resinmasters.com.au | Free on-site assessment + 48-hour written quote
 Brisbane · Gold Coast · Logan · Sunshine Coast · Toowoomba · Ipswich · North NSW
Frequently Asked Questions — Garage Floor Preparation for Epoxy
Do I need to grind my garage floor before applying epoxy, or is acid etching enough?
Diamond grinding is the professional standard for garage floor preparation — and at Resin Masters, it is non-negotiable on every installation we complete across Brisbane, Gold Coast, Logan, Sunshine Coast, Toowoomba, Ipswich, and Northern NSW. Grinding uses industrial diamond-impregnated tooling to mechanically abrade the concrete surface, opening its pores and creating a textured profile that 100% solids epoxy bonds into. Acid etching (muriatic acid wash) is a surface-chemical treatment that creates a limited etch depth and leaves behind residue that interferes with epoxy adhesion if not fully neutralised. Acid etching may be acceptable for light-duty water-based epoxy paints — but it is inadequate for 100% solids commercial-grade epoxy systems under vehicle traffic. The failure mode is consistent: acid-etched floors delaminate within one to two Australian summers under vehicle heat and thermal cycling. Diamond grinding prevents this failure by creating the adhesion depth the system requires.
What is the best method to degrease a concrete garage floor before epoxy?
Oil contamination is the single most common cause of epoxy delamination in Australian garages — and standard cleaning products do not remove it adequately. The correct degreasing process involves: (1) identifying contaminated zones by applying a few drops of water — if the water beads rather than absorbs into the concrete, oil impregnation is present; (2) applying an alkaline concrete degreaser at the manufacturer’s specified concentration; (3) scrubbing with a stiff deck brush and leaving the product to dwell for the specified time; (4) thoroughly rinsing and extracting with a wet vacuum; and (5) repeating if the water bead test still shows contamination. For deeply impregnated oil — common in garages that have seen years of vehicle maintenance — scarification (mechanical removal of the contaminated concrete surface layer) is required before diamond grinding. Resin Masters assesses and treats oil contamination during every preparation stage across all 7 service locations.
How do I remove old paint or sealers from a concrete garage floor before epoxy?
Existing paint, sealer, and previous coating systems must be fully removed before any quality epoxy installation. Diamond grinding is the correct removal method — industrial grinders with appropriate tooling profile through the existing coating and into the concrete substrate simultaneously. Attempting to apply epoxy over an existing coating without removal produces an adhesion failure between the new system and the old coating rather than a bond to the concrete. Chemical paint strippers work for isolated areas but are inadequate as a whole-floor preparation method for epoxy. For floors with thick paint build-up or multiple coating layers, heavy-duty diamond cup tooling or shot blasting removes the material efficiently. Resin Masters removes all previous coatings during the grinding stage on every installation.
How do I test for moisture in a concrete garage slab — and why does it matter?
Moisture vapour emission from concrete slabs is one of the most overlooked causes of epoxy failure in Australian garages. Concrete is never fully dry — it continuously emits moisture vapour through the surface, and when this vapour pressure beneath the epoxy film exceeds the film’s vapour permeability, the coating blisters and delaminates from below. The simplest field test: tape a 300mm × 300mm square of clear plastic sheeting to the prepared slab surface with all edges sealed and leave it for 16–24 hours. Condensation forming under the plastic confirms elevated moisture vapour emission. The professional method uses a calibrated moisture vapour emission meter to quantify the reading in grams per square metre per 24 hours. Resin Masters tests every garage slab across Brisbane, Gold Coast, Logan, Sunshine Coast, Toowoomba, Ipswich, and Northern NSW before applying any primer — and selects the appropriate moisture-tolerant primer based on the actual reading.
What is the best primer for epoxy adhesion on a concrete garage floor?
The correct primer is determined by the slab’s moisture vapour emission reading — not by a single product recommendation. For slabs with standard moisture readings, a penetrating epoxy primer applied over the diamond-ground surface creates the chemical foundation the garage epoxy bonds into. For slabs with elevated moisture readings (common in older Brisbane and Ipswich garages, coastal Gold Coast properties, and any slab near garden beds or lawn areas), a moisture-tolerant primer or moisture vapour barrier primer is required. Resin Masters selects primer chemistry matched to the actual moisture reading on your specific slab — and only applies primer after testing, not before. The primer is also matched for chemical compatibility with the specific 100% solids low-VOC epoxy system going above it.
How do I repair cracks in a concrete garage floor before epoxy — what products work best?
Crack repair approach depends on crack type: (1) Surface cracks (hairline, non-structural, non-moving) — these are typically filled with an epoxy crack filler or polyurea joint filler, ground flush after cure, then incorporated into the overall floor preparation. (2) Active cracks (those that show evidence of ongoing movement) — flexible polyurea or polyurethane crack filler accommodates ongoing movement better than rigid epoxy filler, which will re-crack if the substrate continues to move. (3) Structural cracks (wide, with vertical displacement, or associated with slab subsidence) — these require geotechnical or structural assessment before any coating is applied; epoxy coating over a structurally failing slab is not a solution. Resin Masters repairs all standard non-structural cracks during the preparation stage — and discloses any structurally significant findings during the free on-site assessment.
What tools and safety equipment do I need to prepare a garage floor for epoxy?
Professional preparation requires: industrial diamond grinder (single or planetary disc), wet-dry vacuum for extraction during grinding, angle grinder with diamond cup wheel for edges and corners, steel scraper for paint and sealer removal, and a stiff deck brush and pump sprayer for degreasing. Essential safety equipment: P2 respirator (concrete dust contains crystalline silica — this is a serious WHS hazard), safety glasses, hearing protection (grinders operate above safe exposure levels without protection), chemical-resistant gloves for degreasing products, and knee pads for ground-level crack work. Most Australian homeowners don’t own industrial preparation equipment, and concrete dust management during DIY grinding — without proper dust extraction — creates a silica exposure risk. Resin Masters brings all preparation equipment and manages dust extraction appropriately on every job across our 7 service locations.
Where can I hire or buy professional-grade garage floor preparation equipment in Australia?
Industrial diamond grinders for floor preparation are available from major Australian equipment hire companies — Kennards Hire, Coates Hire, and Total Tools Tool Hire stock these in most capital cities. Day hire rates run approximately $120–$250 for a single-disc grinder, with diamond tooling hired or purchased separately at $80–$180 per segment set depending on hardness rating. For a standard 36m² double garage, plan for 4–8 hours of grinding time for an experienced operator. The critical factor is dust extraction: a standard vacuum is inadequate for concrete dust. You need an industrial dust extractor with HEPA filtration — also available at equipment hire companies. Without proper dust extraction, diamond grinding creates silica dust at concentrations that exceed safe exposure limits. Many homeowners who attempt DIY preparation underestimate both the time required and the safety implications.
How long should I wait after cleaning or grinding before applying epoxy to a garage floor?
After diamond grinding, Resin Masters applies primer within the same day where conditions allow — grinding removes the surface laitance and opens the concrete pores, and immediate primer application prevents dust and environmental contamination from compromising the prepared surface. After degreasing and water rinsing, the concrete must be fully dry before any epoxy product is applied — typically 24–48 hours in Queensland’s climate, longer in cooler Toowoomba conditions or during high-humidity periods. After acid etching (where used), the concrete must be rinsed until the rinse water reads pH neutral, then allowed to dry fully — typically 48–72 hours. Resin Masters schedules all preparation and coating stages to avoid temperature extremes during application — for Ipswich and Brisbane installations in peak summer, morning application starts are standard to maintain working time and application quality.
How do I know if my garage floor is properly prepared and ready for epoxy?
The prepared surface should pass three checks before any epoxy is applied. (1) Water absorption test: sprinkle water across the prepared surface — it should absorb quickly and evenly across the entire floor with no beading anywhere. Beading indicates either remaining contamination or an over-etched surface that has sealed rather than opened. (2) Surface profile check: the prepared concrete should have a visible texture like 60–80 grit sandpaper when viewed at an angle under raking light — smooth, shiny concrete has insufficient profile for 100% solids epoxy adhesion. (3) Cleanliness test: run a white cloth or glove across the prepared surface — it should pick up minimal dust. Excessive dust indicates inadequate vacuum extraction during grinding. Resin Masters performs all three checks before applying any primer on every installation.
Can I prepare my garage floor myself, or should I hire a professional?
DIY garage floor preparation is feasible for experienced DIY operators with access to the right equipment — but the failure rate for DIY-prepared garage floors is significantly higher than for professionally prepared floors. The common DIY failure points are: using acid etching rather than diamond grinding (inadequate adhesion depth); missing oil contamination zones that require specific treatment before coating; inadequate dust extraction during grinding (creating silica exposure hazard and surface contamination); and applying primer or coating without proper moisture testing. Resin Masters’ professionally prepared and installed garage floor systems across Brisbane, Gold Coast, Logan, Sunshine Coast, Toowoomba, Ipswich, and Northern NSW are backed by a 7-year warranty — which covers the preparation quality as well as the coating system. A DIY-prepared floor, however well-intentioned, cannot carry that warranty because the preparation quality cannot be guaranteed.
What are the top-rated concrete preparation products available in Australia?
The Australian concrete preparation product market breaks into three categories: degreasers (alkaline concrete cleaners available from trade distributors, Bunnings, and direct from epoxy coating suppliers — brands like Dulux Prepmaster, ITW Selleys, and trade-focused brands available through industrial supply companies); crack fillers (two-part polyurea or epoxy fillers — Sika, Mapei, and Fosroc are established Australian distributors with wide trade availability); and primers (the correct primer is system-specific and supplied matched to the specific epoxy system above it — Resin Masters uses commercial-grade primers matched to our 100% solids low-VOC epoxy formulations). For homeowners buying preparation products independently, always confirm compatibility between the degreaser, primer, and epoxy product before purchasing — incompatible chemistry between preparation products and coating systems is a common cause of premature coating failure.
What are the five most important preparation steps Resin Masters follows on every garage floor installation?
Resin Masters follows a consistent five-stage preparation protocol on every garage floor installation across all 7 service locations: (1) Oil contamination identification and treatment — water bead testing across the full floor, degreaser application and extraction for contaminated zones, scarification where deep oil impregnation requires it. (2) Previous coating or paint removal — diamond grinding through any existing coatings, paint, sealer, or surface treatments to reach bare concrete. (3) Industrial diamond grinding — full-floor mechanical profiling to the surface texture the specific epoxy system requires; edges and corners finished with a hand grinder and diamond cup wheel. (4) Crack and surface defect repair — polyurea or epoxy filler for hairline and surface cracks, ground flush after cure; disclosure of structural cracks in the written quote. (5) Moisture vapour testing and primer selection — slab MVE testing, primer matched to the actual reading, applied immediately after grinding is complete and before any environmental contamination can occur on the prepared surface.
How does preparation quality affect the 7-year warranty Resin Masters provides?
Preparation quality is the foundation on which the 7-year Resin Masters warranty is built. The warranty covers any delamination or adhesion failure arising from our preparation or installation process within 7 years of installation — which means the warranty is only deliverable when the preparation is correct. Shortcuts in preparation — under-grinding, skipping oil treatment, applying primer over moisture without testing — produce adhesion failures that no product quality can prevent. This is why Resin Masters does not skip preparation steps regardless of project budget or timeline, and why our written warranty is meaningful rather than aspirational. When you receive a Resin Masters quote, preparation is itemised as a separate line — diamond grinding, contamination treatment, moisture testing, and primer are all included in the quoted price, not optional extras added after the floor fails. Every garage floor epoxy installation across Brisbane, Gold Coast, Logan, Sunshine Coast, Toowoomba, Ipswich, and Northern NSW receives the same preparation standard.